
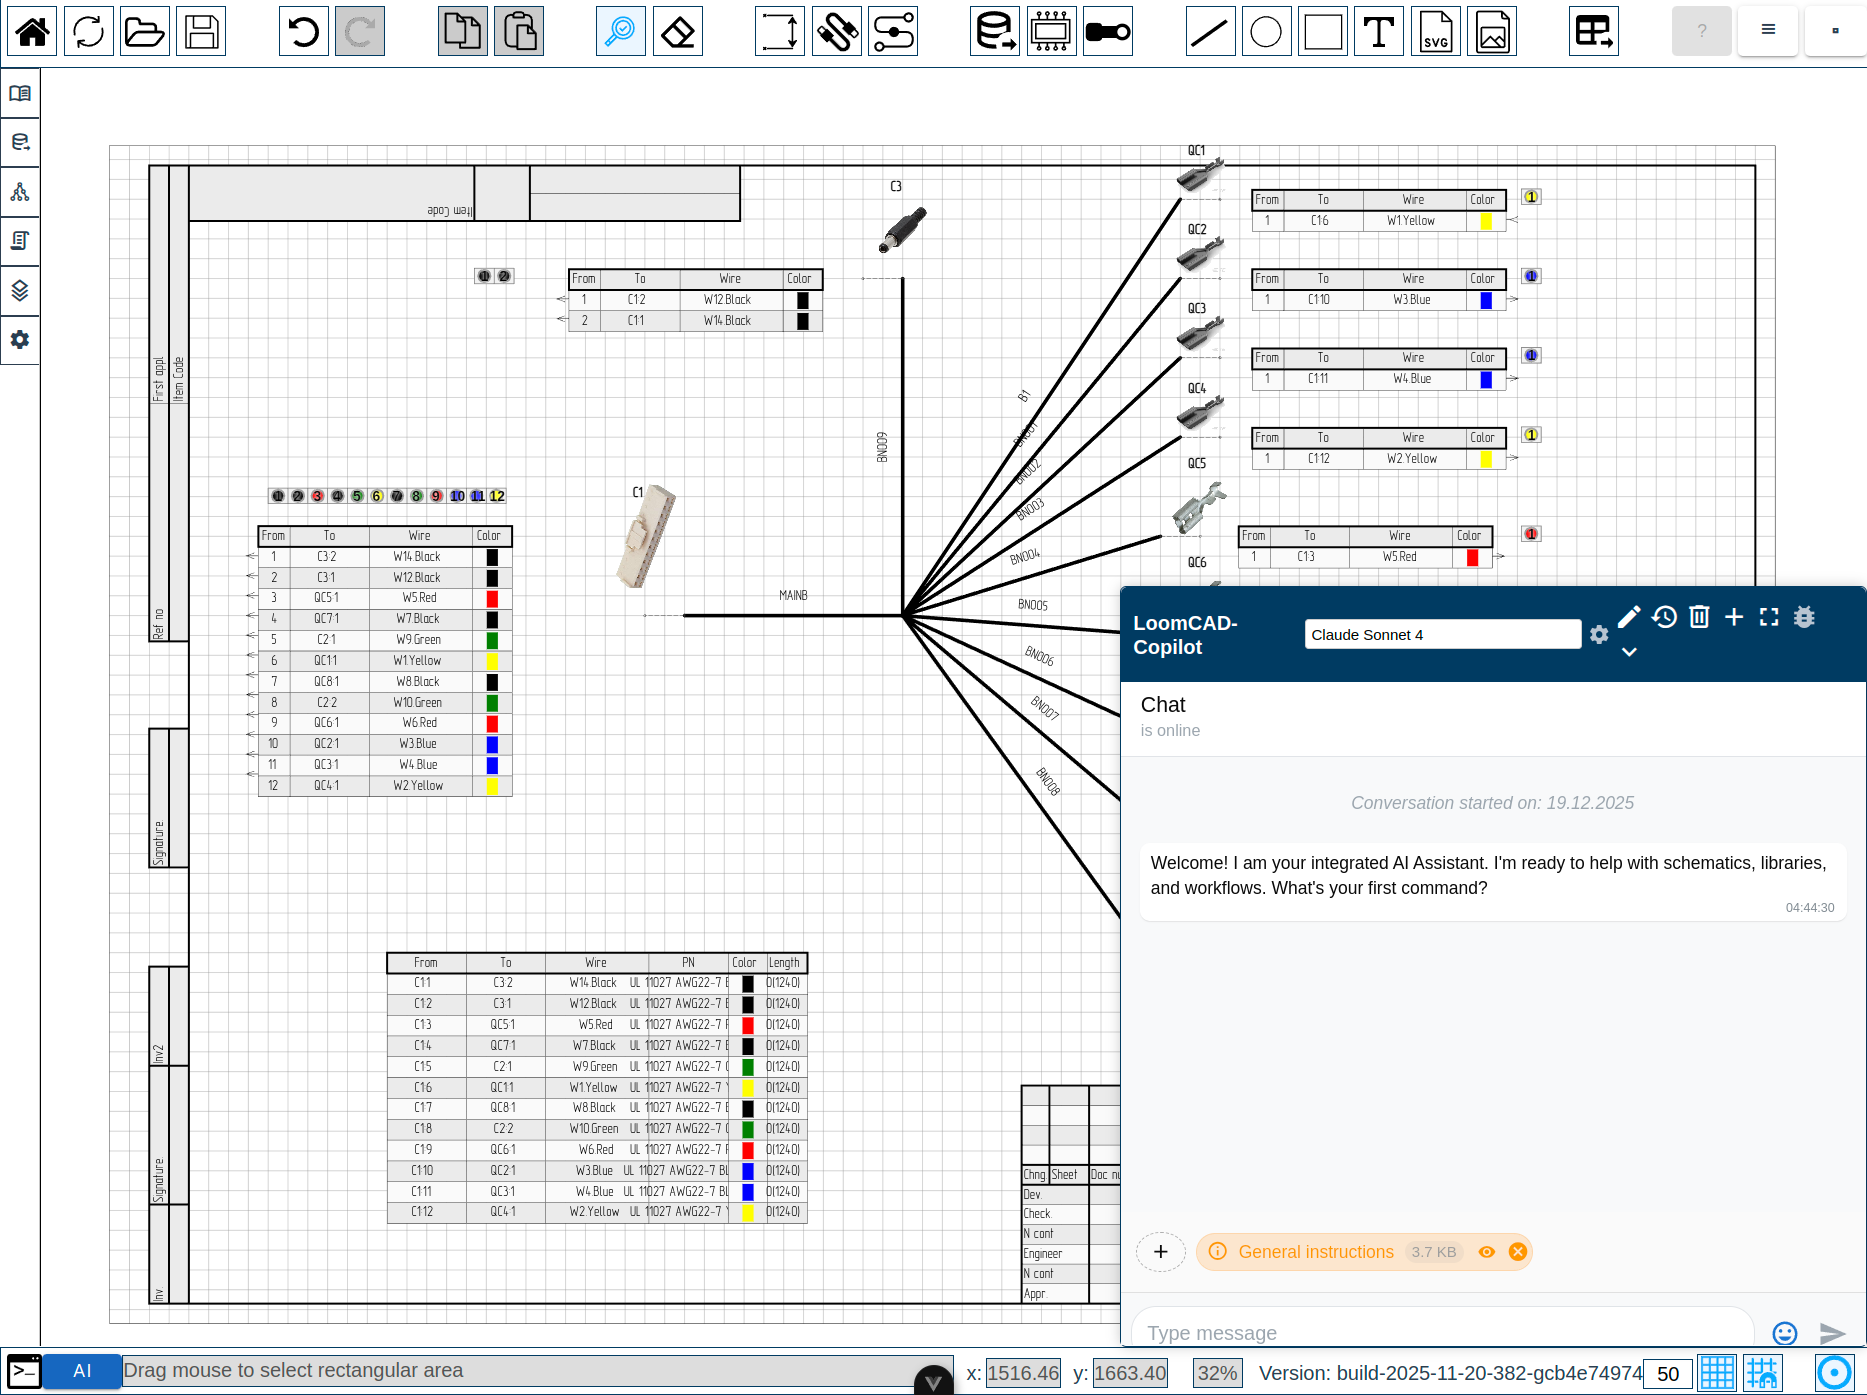
AI Chat Panel
The AI Chat is your intelligent design assistant built into LoomCAD. It understands natural language commands and can create components, wires, and perform design tasks automatically.
TIP
For AI capabilities, prompting strategies, and workflow guides, see AI Copilot Overview. This page focuses on the panel interface and controls.
TIP
You can configure your own API keys for AI providers in Profile Menu → API Keys. This gives you higher rate limits and more control over your AI usage.
Opening AI Chat
Method 1: ![]() click AI button in Status Bar
click AI button in Status Bar
Method 2: (if configured) Use keyboard shortcut
The AI Chat panel appears as a floating, draggable window. New users see a welcome message with quick-start tips on first opening. Hover over the header to see the move cursor, then drag to reposition:
Panel Layout

Header
- Chat title - auto-generated or custom name
- Model selector - choose AI provider/model
Header buttons (left to right):
| Button | Description |
|---|---|
| Model settings | |
| Chat settings | |
| Chat history | |
| Chat actions | |
| New chat | |
| Expand to fullscreen | |
| Toggle debug info (show/hide message IDs) | |
| Hide chat |
Model selector dropdown:
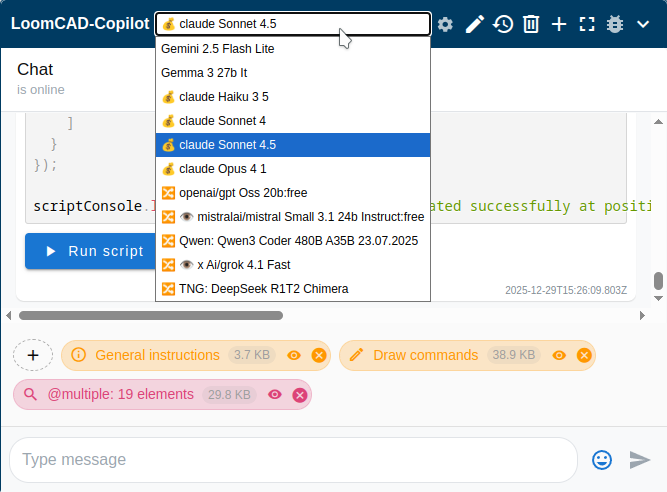
| Provider | Models | Notes |
|---|---|---|
| Anthropic | Claude Sonnet, Claude Opus, Claude Haiku | Recommended |
| Gemini, Gemma | Fast, multimodal | |
| OpenRouter | GPT, Mixtral, 100+ models | Variety of options |
| LM Studio | Local models | Privacy, offline use |
Model Settings
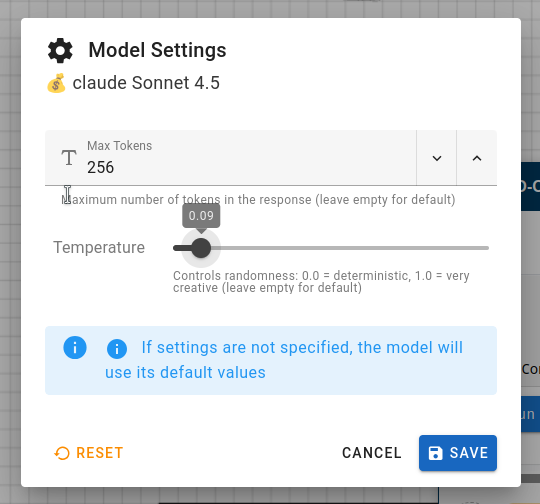
| Element | Description |
|---|---|
| Current model | Shows selected AI model |
| Max Tokens | Maximum number of tokens in the response (leave empty for default) |
| Temperature | Controls randomness: 0.0 = deterministic, 1.0 = very creative (leave empty for default) |
| Reset to default values | |
| CANCEL | Close without saving |
| Save settings |
Note: If settings are not specified, the model will use its default values.
Chat Settings
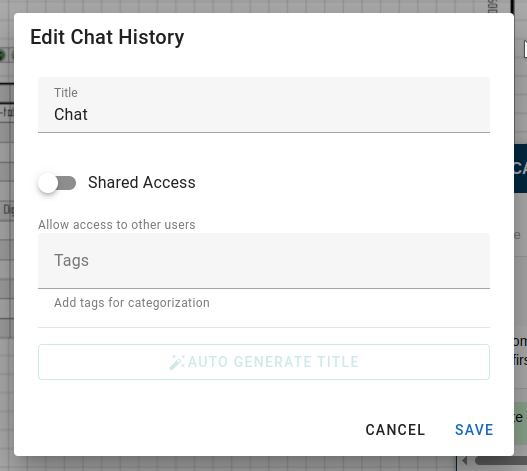
| Element | Description |
|---|---|
| Title | Chat name (editable) |
| Shared Access | Toggle to allow access to other users |
| Tags | Add tags for categorization |
| ✨ AUTO GENERATE TITLE | Auto-generate chat title based on content |
| CANCEL | Close without saving |
| SAVE | Save changes |
Chat Actions
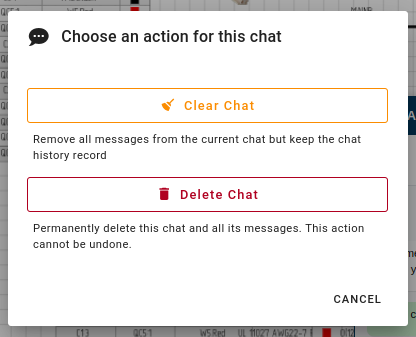
| Element | Description |
|---|---|
| Remove all messages but keep the chat history record | |
| Permanently delete chat and all messages (cannot be undone) | |
| CANCEL | Close dialog |
Fullscreen Mode

Fullscreen mode expands the chat to fill the entire window. Press ![]() or Esc to exit.
or Esc to exit.
Message Area
- Your messages - right-aligned
- AI responses - left-aligned
- Code blocks - syntax highlighted
- Context badges - shows what AI can see
Input Area
- Message input - type your prompt
- Send button - submit message
Sending Messages
Basic Usage
- Type your message in the input field
- Press Enter or
 click
click
- AI responds with text and/or code
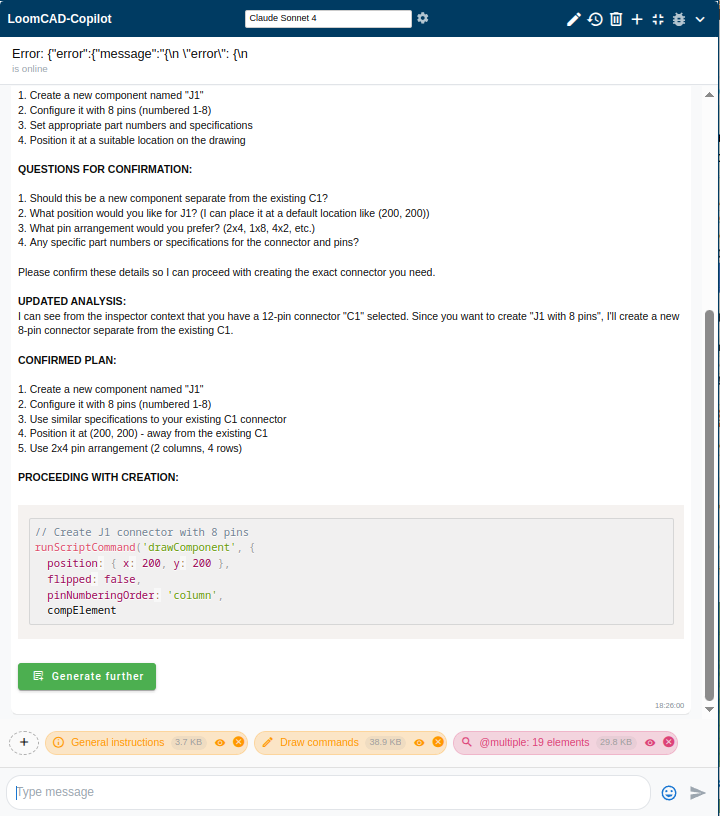
Example Commands
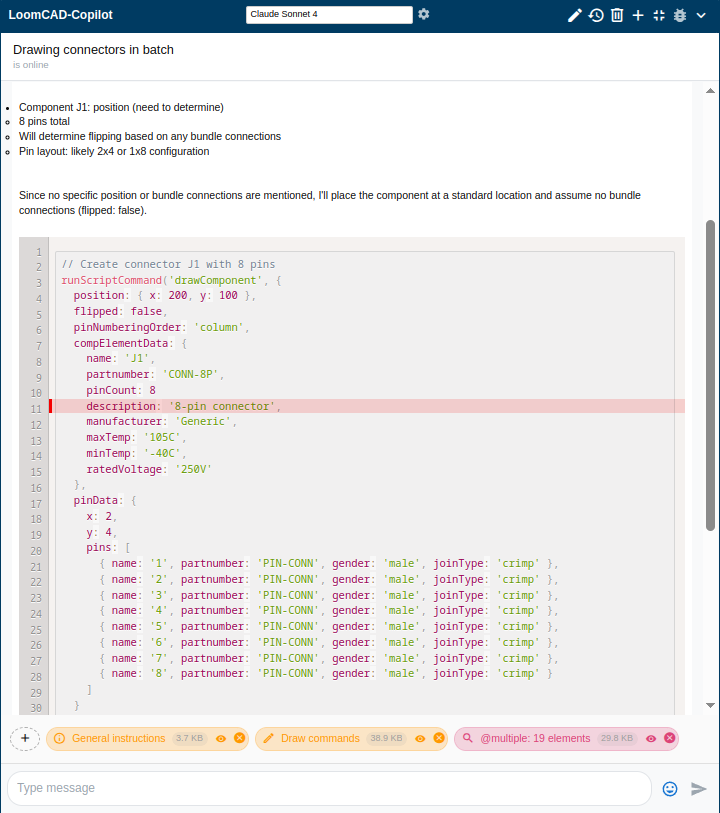
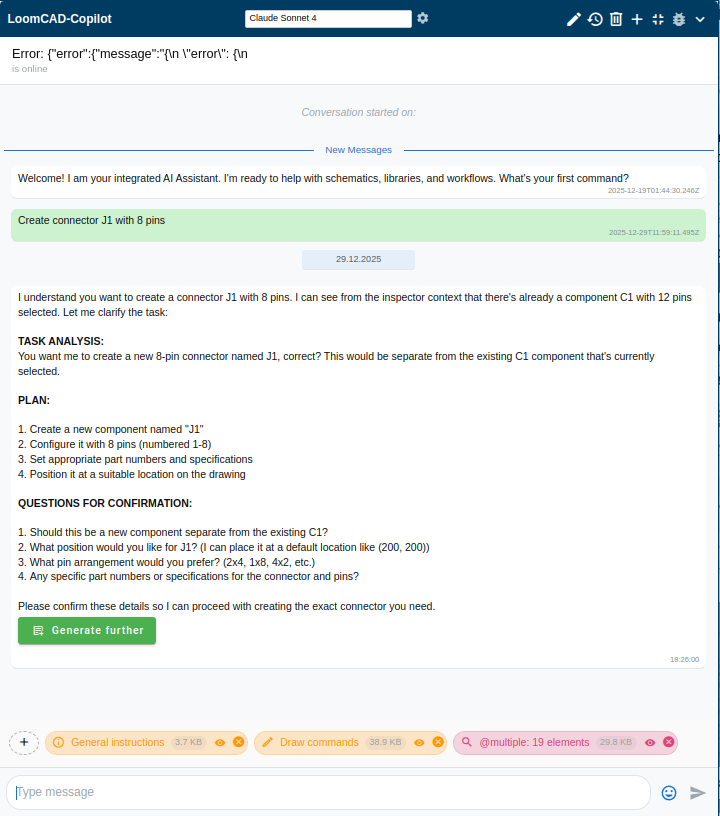
Create components:
Create connector J1 with 8 pinsConnect wires:
Add a red wire from J1 pin 1 to J2 pin 1Batch operations:
Create 5 connectors J1-J5, all 4-pinAsk questions:
How do I export to PDF?Context Badges
Context badges are information blocks that are sent to AI along with your message.

Badge Panel Elements
| Element | Description |
|---|---|
| + | Add badge button — opens dropdown (see below) |
| Badge icon | Type indicator |
| Badge name | Content description |
| Size | Data size (e.g., "3.7 KB") |
| Toggle visibility — temporarily disable without removing | |
| Remove badge |
Add Badge Dropdown
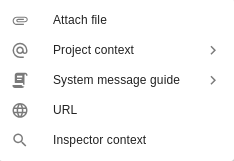
| Option | Description |
|---|---|
| Attach file | Attach a file (images, PDF, text/markdown) |
| Project context | Submenu with project data options (see below) |
| System message guide | Submenu with instruction templates (see below) |
| URL | Add web page content |
| Inspector context | Add selected element's properties |
Project Context Submenu
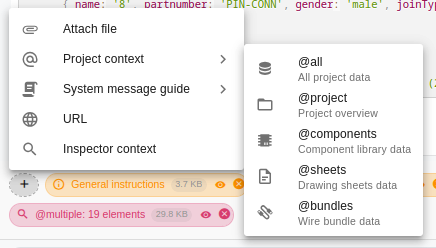
| Option | Description |
|---|---|
| @all | All project data |
| @project | Project overview |
| @components | Component library data |
| @sheets | Drawing sheets data |
| @bundles | Wire bundle data |
System Message Guide Submenu
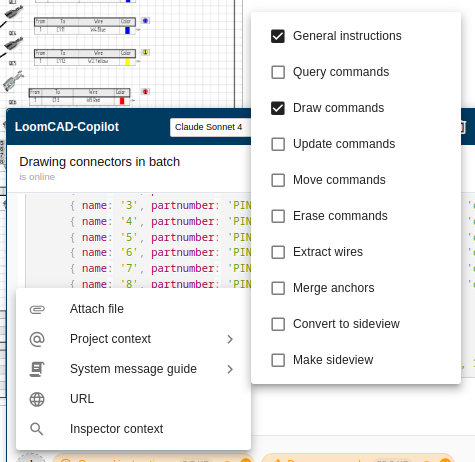
Instruction templates that can be enabled/disabled:
| Template | Description |
|---|---|
| General instructions | Basic AI behavior guidelines |
| Query commands | Commands for querying project data |
| Draw commands | Commands for creating elements |
| Update commands | Commands for modifying elements |
| Move commands | Commands for repositioning elements |
| Erase commands | Commands for deleting elements |
| Extract wires | Wire extraction instructions |
| Merge anchors | Anchor merging instructions |
| Convert to sideview | Side view conversion instructions |
| Make sideview | Side view creation instructions |
| Revision commands | Commands for managing revisions |
Enabled templates are included as context badges automatically.
Attachments
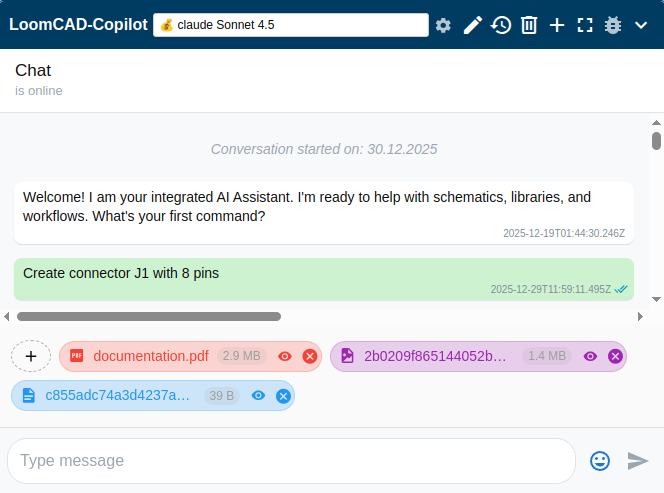
Add context by attaching files:
| Type | Use Case |
|---|---|
| Images | Wiring diagrams, photos |
| PDFs | Datasheets, specifications |
| Text files | Any text format: TXT, JSON, YAML, XML, CSV, etc. |
To attach:
- click + in the badge panel
- Select Attach file
- Choose file from disk
Image Analysis Use Case
When you attach an image:
Extract the wires from this wiring diagramAI analyzes the image and can:
- Identify components
- Detect wire connections
- Propose schematic creation
Using Badges
- Add badges to provide context to AI
- AI automatically accesses badge data
- No need to copy-paste information
- Toggle visibility to temporarily exclude data
Example with DigiKey badge:
Create connector J1 using this DigiKey componentAI reads the specs from the open DigiKey dialog and creates the component with all properties.
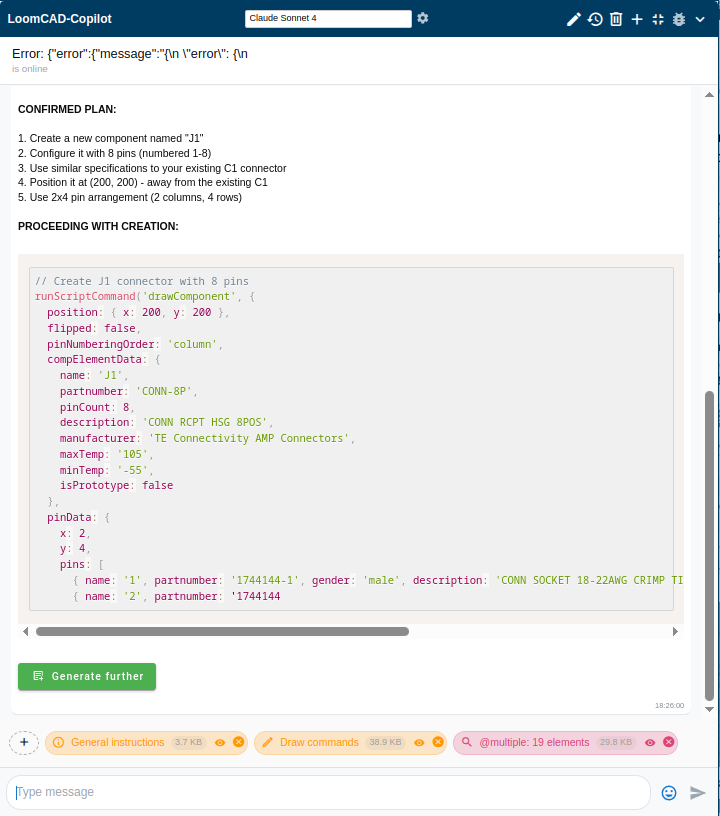
Code Execution
AI can generate JavaScript code to modify your design.
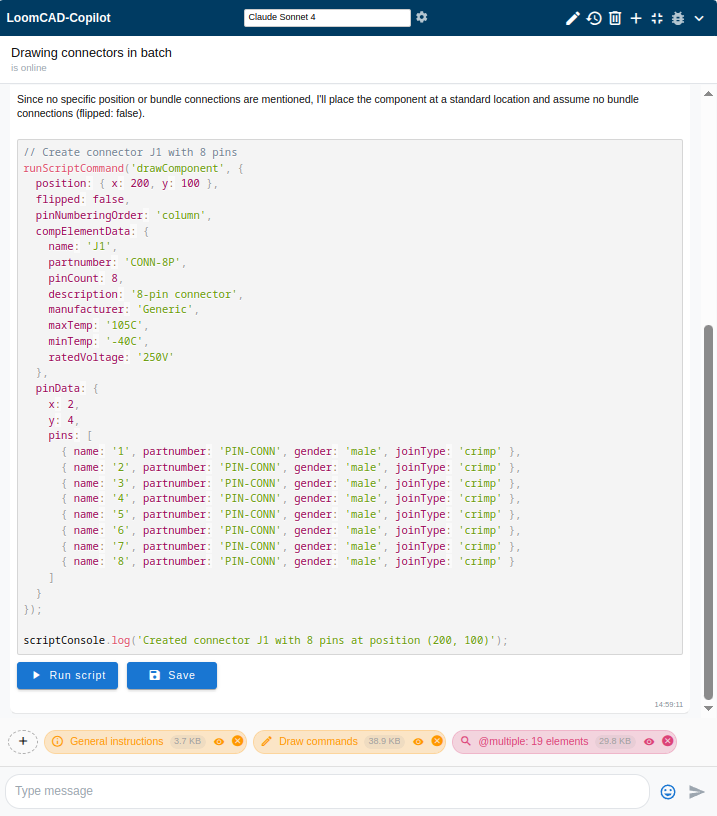
Running AI-Generated Code
- AI provides code in a code block
- click
 Run script
 - Code executes on your design
- OK message appears if script ran successfully

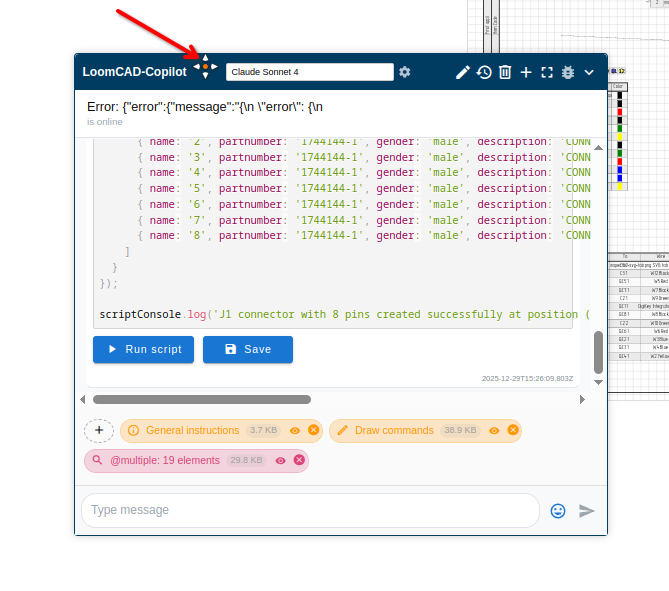
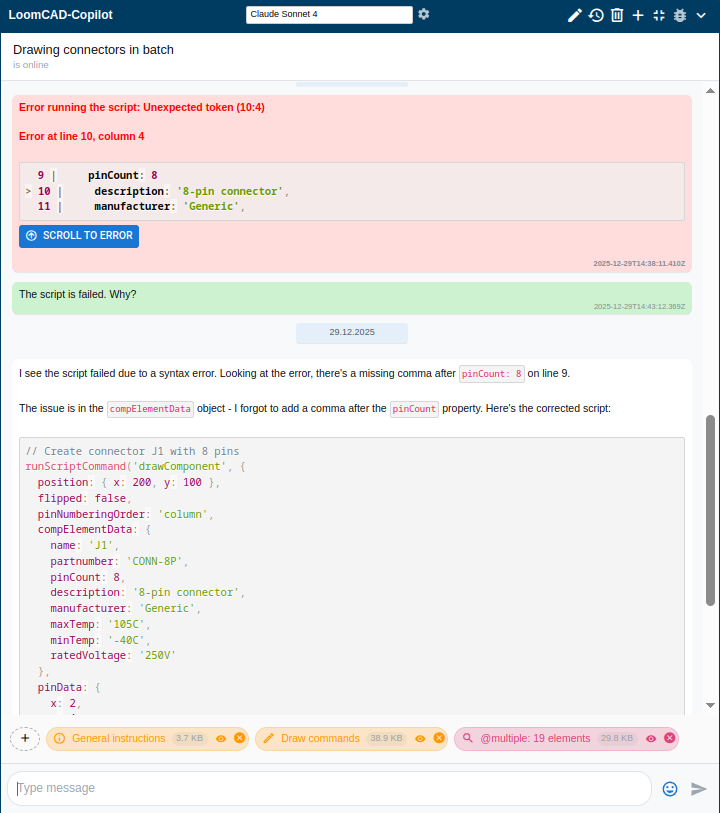
Script Errors
If script has errors, an error message appears with details:
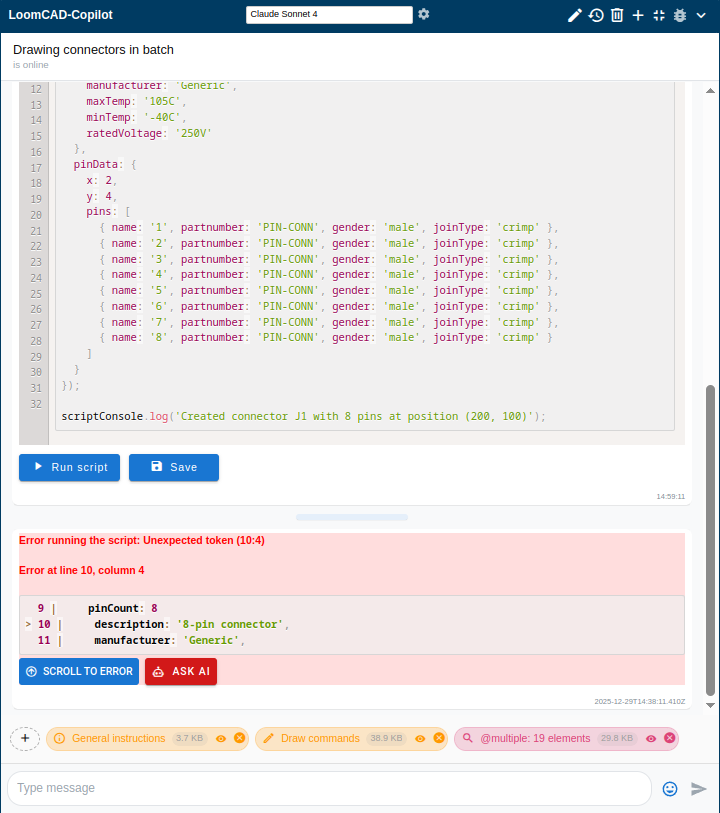
| Element | Description |
|---|---|
| Error message | Description of the error |
| Line/column | Error location in code |
| Code snippet | Fragment with highlighted error line |
| Jump to error in code block | |
| Ask AI to fix the error |
Error line is highlighted automatically. ![]() click
click![]() SCROLL TO ERROR to scroll to it if not visible:
SCROLL TO ERROR to scroll to it if not visible:
![]() ASK AI to get error explanation and corrected script:
ASK AI to get error explanation and corrected script:
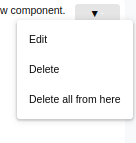
Manual Edit
You can also fix errors manually by editing the message:
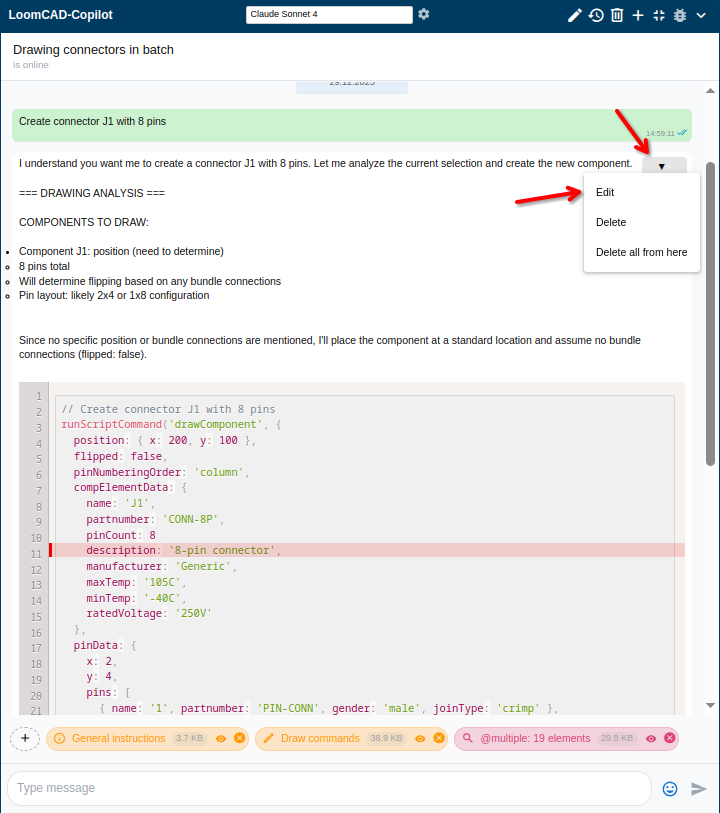
| Option | Description |
|---|---|
| Edit | Edit the message content |
| Delete | Delete this message |
| Delete all from here | Delete this and all following messages |
After selecting Edit, the message becomes editable:

- Edit the code in the text area
- click Save to apply changes
- Error indication resets and script can be run again
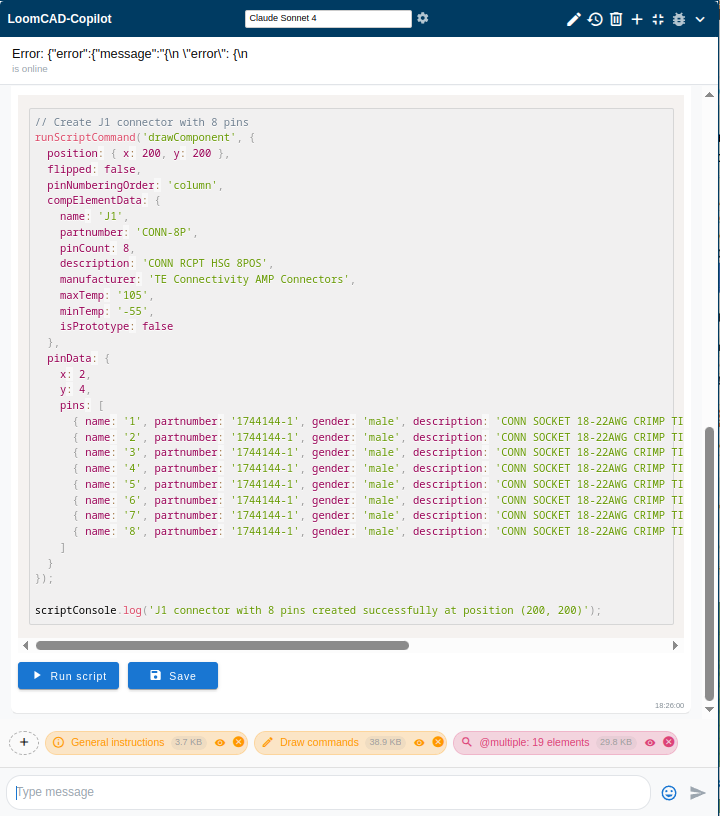
Code Block Features
| Feature | Description |
|---|---|
| Syntax highlighting | JavaScript code is colored |
| Copy button | Copy code to clipboard |
| Execute the code | |
| Save script for reuse | |
| Error markers | Shows line numbers with errors |
Save Script
![]() Save to save the script for later reuse:
Save to save the script for later reuse:
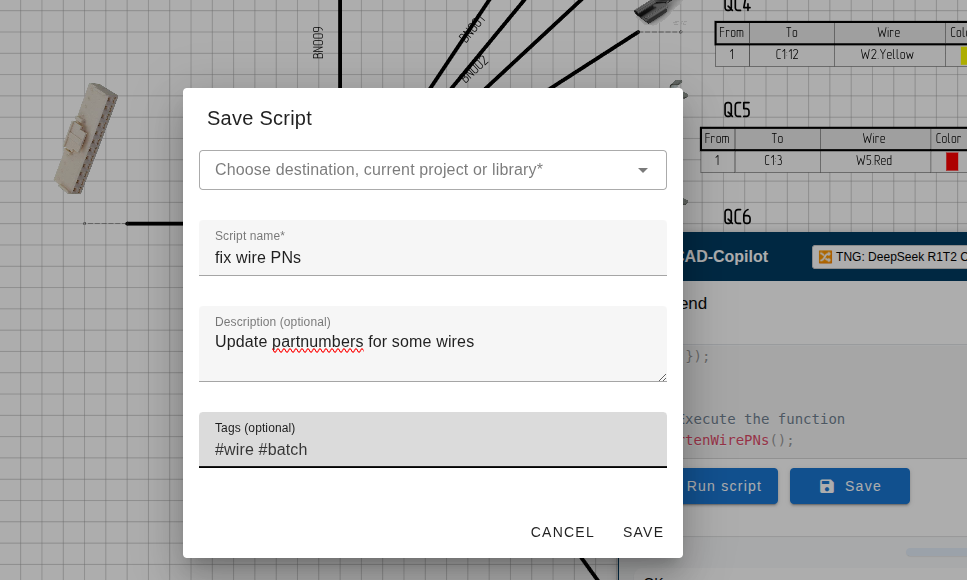
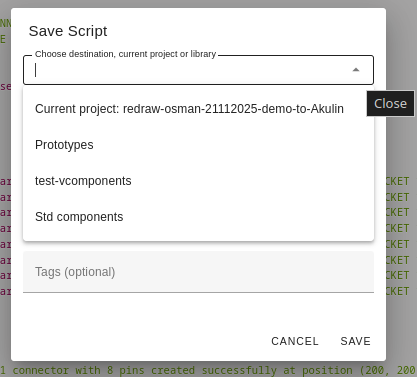
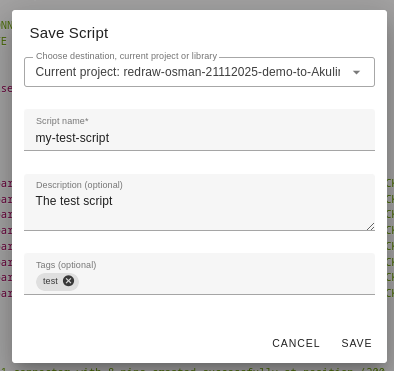
| Field | Description |
|---|---|
| Destination | Choose current project or library |
| Script name | Required name for the script |
| Description | Optional description |
| Tags | Optional tags for organization |
Destination dropdown example:
Filled form example:
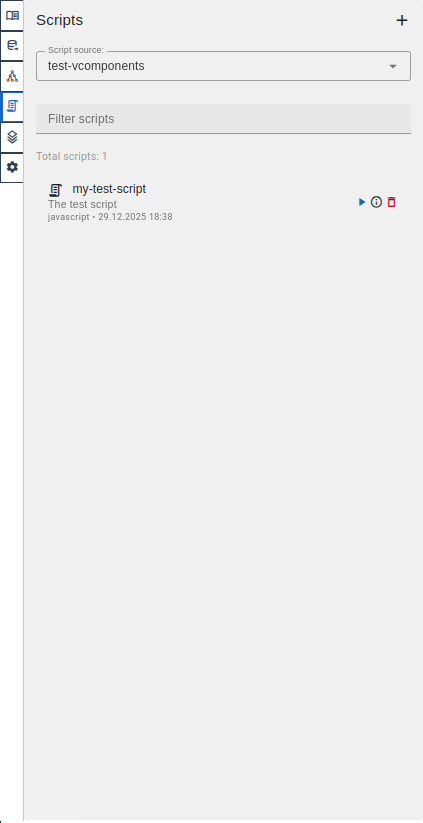
After saving, the script appears in the Scripts tab in the Sidebar:
Safe Execution
- Code runs in a sandboxed environment
- Can only affect your LoomCAD project
- Cannot access external systems
- Undo available if something goes wrong (Ctrl+Z)
Generate Further
When the AI model runs out of context window space, it may produce an incomplete response. In this case, a ![]() Generate further button appears at the end of the message.
Generate further button appears at the end of the message.
When the response is complete, the button disappears and ![]() Run script /
Run script / ![]() Save buttons appear for code blocks:
Save buttons appear for code blocks:
Message Actions
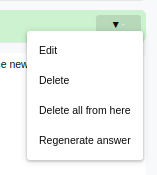
| Action | Description |
|---|---|
| Edit | Edit message content |
| Delete | Delete this message |
| Delete all from here | Delete this and all following messages |
| Regenerate answer | Regenerate AI response to this message |
AI Message Actions
| Action | Description |
|---|---|
| Edit | Edit message content |
| Delete | Delete this message |
| Delete all from here | Delete this and all following messages |
Edit Messages
available:
Quick Edit
- Edit the text directly
- click Save to apply
Message Editor
editor:
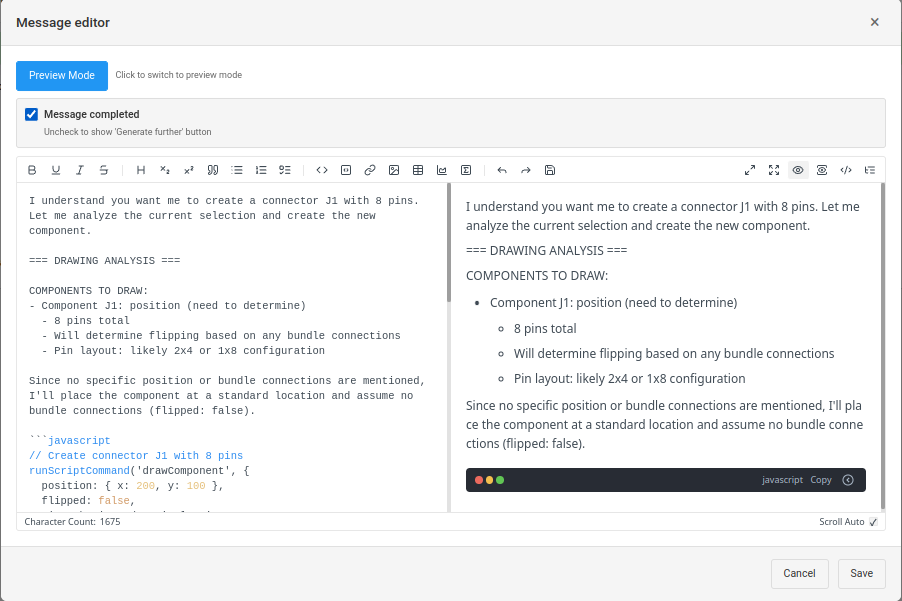
| Element | Description |
|---|---|
| Preview Mode | Return to quick edit mode |
| Formatting toolbar | Bold, italic, lists, code blocks, tables, etc. |
Common Elements
Available in both editing modes:
| Element | Description |
|---|---|
| Message completed | Uncheck to show "Generate further" button |
| Editor pane | Raw markdown text on the left |
| Preview pane | Rendered preview on the right |
| Character Count | Shows message length |
| Scroll Auto | Auto-scroll preview with editor |
| Cancel / Save | Discard or apply changes |
Delete Messages
here** to remove the message and all following messages.
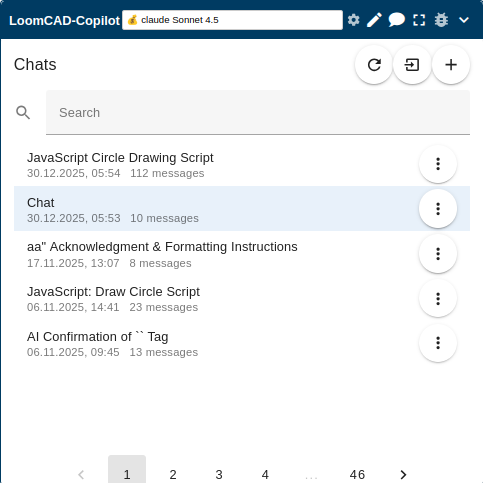
Chat Management
chat history list:
Main Header
In list mode, the main header shows an additional button:
| Element | Description |
|---|---|
| Back to current chat |
All other buttons remain the same as in Header.
List Header
| Element | Description |
|---|---|
| Chats | Panel title |
| Refresh chat list | |
| Import chat history from previously exported JSON file | |
| Create new chat |
Create New Chat Dialog
Header or ![]() from List Header to open:
from List Header to open:
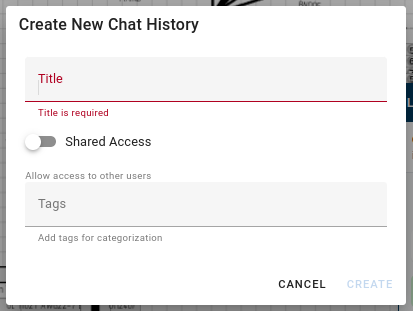
| Element | Description |
|---|---|
| Title | Chat name (required) |
| Shared Access | Toggle to allow access to other users |
| Tags | Add tags for categorization |
| CANCEL | Close without creating |
| CREATE | Create new chat |
Search
Type in the search field to filter chats by title.
Chat List
Each chat item shows:
| Element | Description |
|---|---|
| Title | Chat name (auto-generated or custom) |
| Date/Time | When chat was last active |
| Message count | Number of messages in chat |
| Chat options menu |
Chat Options Menu
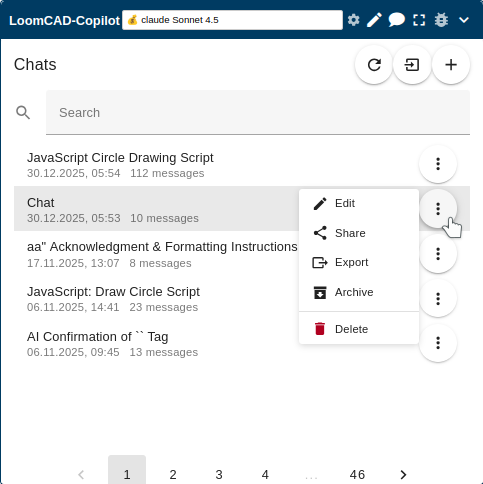
| Option | Description |
|---|---|
| Edit chat title and settings | |
| Share chat with other users | |
| Export chat to JSON file | |
| Move chat to archive | |
| Delete chat permanently |
Pagination
Navigate through pages of chats using the page numbers at the bottom.
Auto-Titling
After your first exchange, AI automatically names the chat based on content. To rename, use Chat Settings.
AI Capabilities
What AI Can Do
- Create components with properties
- Draw wires and bundles
- Modify existing elements
- Answer questions about LoomCAD
- Explain features and workflows
- Generate batch operations
- Analyze designs for issues
What AI Cannot Do
- Access external websites (except via badges)
- Modify system files
- Execute arbitrary system commands
- Access other users' projects
Troubleshooting
"No API Key" Error
Configure API keys in Profile Menu → API Keys:
- click your profile in the top right
- click API Keys
- Enter key for your provider
- click UPDATE to save
Rate Limit Errors
If you hit rate limits:
- Wait a few minutes
- Use a different model
- Configure your own API key (higher limits)
AI Not Understanding
Try:
- Be more specific in your prompt
- Provide context with badges (open Inspector, DigiKey)
- Break complex requests into steps
- Use simpler language
Related Topics
- Status Bar - AI Chat toggle button
- Inspector - Inspector badge context
- Profile Menu - API key configuration